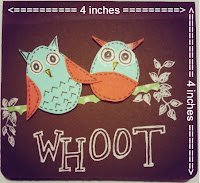
I designed this card for a gift. This is a neutral card. You can change the message and present it to anyone on any occasion. It is very easy to create. The materials required are also minimal and easily available. This card can be easily made by a kid. But make sure there is supervision of a parent or someone elder for cutting purposes.
Materials Used:
- Card stock/drawing sheet (Brown, Green, Orange, Teal, White)
- Gel Pen (White and Black)
- Pencil
- Glue
- Scissors
STEPS to CRAFT:
I. Create the Card base -
1. Cut the brown sheet to length = 8 inches and width = 4 inches.
2. Then fold it in half along the longer side (8 inches side). This forms the card base. The size of the card is 4 X 4 inches.
II. Create the Owls -
a. Body of the Owls -
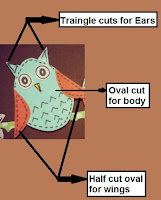
1. Take the teal sheet and draw two ovals. Cut the two ovals. This is the body of the owls.
(Note: You can keep the size of the ovals same or different.)
b. Ears and Wings of the Owls -
b1. For the Owl 1:-
1. Cut two small triangles from the teal sheet. The triangles size should correspond to the oval piece to form the ears.
2. Take the orange sheet and cut an oval shaped piece. Make sure to keep the size of this oval half or slightly more than half the size of the owl body.
3. Cut the orange sheet oval into half along the long side to have two wings for the owl.
b2. For the Owl 2:-
1. Cut two small triangles from the orange sheet. The triangles size should correspond to the oval piece to form the ears.
2. Then draw an outline of the second teal oval on the orange sheet. Cut this oval piece from the orange sheet.
3. Now just below the half way mark of this orange oval, across the shorter side cut it. Make sure to keep a round edge.
c. Eyes and Nose of the Owls -
1. Cut out two circles from white sheet for each of the Owls. Keep the measurements corresponding to the Owl’s body.
2. Then cut two small triangles from the white sheet. Colour the two pieces yellow.
d.Arrange the owl pieces -
1. Once all the required pieces are cut, glue them together like in the photo. This forms the owl structure.
III. Assemble the card -
1. Cut a thin strip of the green sheet to form the branch.
2. Stick the green sheet onto the brown card base.
3. On top of the green branch arrange the two owls as per your wish and glue them down.
4. After all the elements are stuck onto the card base, you can add details. Draw some leaves and write a message with the white gel pen.
5. Use the black gel pen to create a faux stitched outline on the owls. Add details to the eyes, nose and ears.
So, there is your card ready to gift.
I am participating in the ‘Ready For Rewards’ activity for Rewardme in association with BlogAdda.
First Image Credits - Blogaada
Rest Images and Article © Copyright Salvwi Prasad


No comments:
Post a Comment
Thank you for stopping by. Your comments help me improve.